 Local Hair Color
How to try on hair color from a photo on iPhone
Trying a new color on your own photo is the easiest way to find out whether you love an idea before you spend money or months on it. Here’s how to get a preview you can actually trust to compare, from picking the photo to saving a copy for your colorist.
The short versionChoose one clear, evenly lit photo. Let the app find your hair, try a few very different shades, adjust the intensity, brush in any missed strands, tap Natural to compare with your original, and save a new copy. Everything happens on your iPhone or iPad.
Start with a photo that shows your hair
Pick a photo where your hair is sharp, well lit, and stands out from the background. A front or three-quarter view from the shoulders up is usually easier to judge than a far-away, full-length shot. Skip heavy beauty filters and photos where your hair nearly matches the wall behind you.
It doesn’t need to be a professional portrait. A selfie by a window works beautifully. What matters is that your hair’s edges, texture, and natural highlights are visible. If there are several people in the photo, crop it first so you’re the obvious subject.
Let the app find your hair
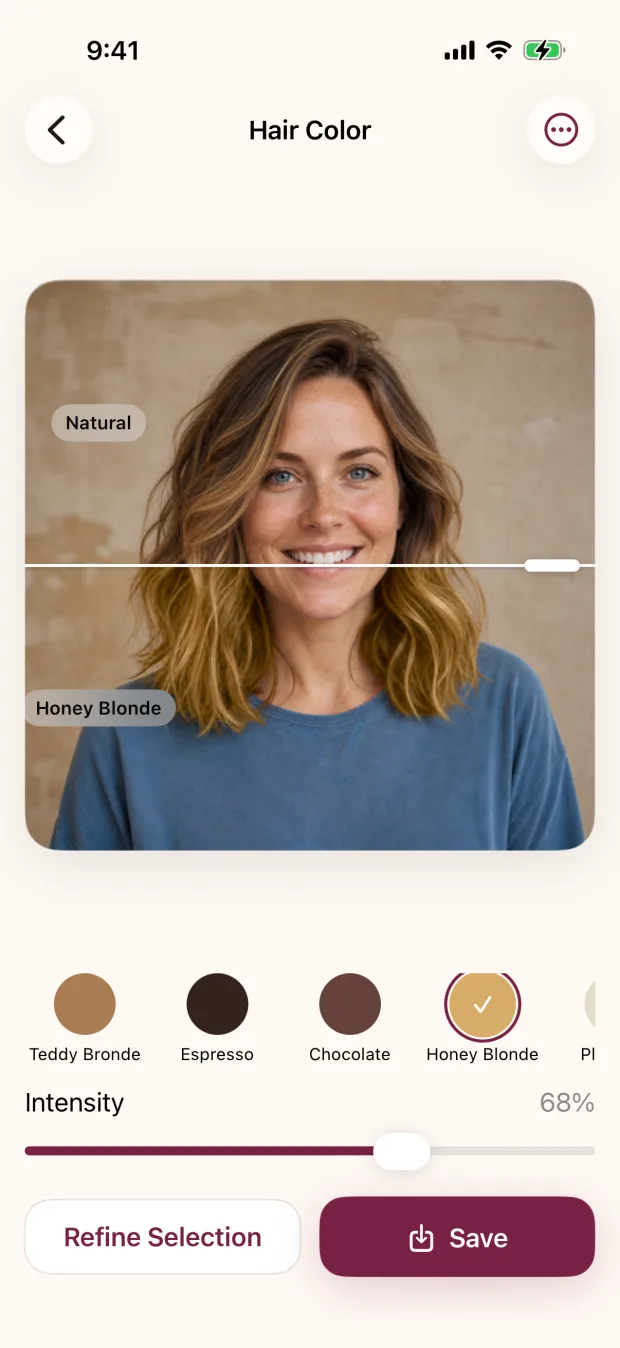
Local Hair Color uses a model built into the app to find the hair in your photo. It runs on your iPhone or iPad, and your photo isn’t sent to a server. Once your hair is found, the app reuses that selection as you try different shades, so switching colors is quick.
Think of the automatic selection as a starting point. Wispy edges, see-through ends, hats, dark hair against a dark background, and bright backlight can all make an edge hard to read. Pinch to zoom and look around your hairline, shoulders, and between curls before deciding whether anything needs fixing.
Try very different shades first
Begin with a few clearly different directions: maybe Honey Blonde, Chocolate, Copper, and Cherry Cola. The first pass is about narrowing the field. If two neighboring shades look almost the same, jump to something further away and come back to the subtle choice later.
Then use the intensity slider. Lower intensity lets more of your own color show through, which is closer to a soft, subtle change; higher intensity makes the new direction obvious. If none of the sixteen shades is quite right, choose Custom and pick any color with Apple’s grid, spectrum, or sliders.
Fix the edges if you need to
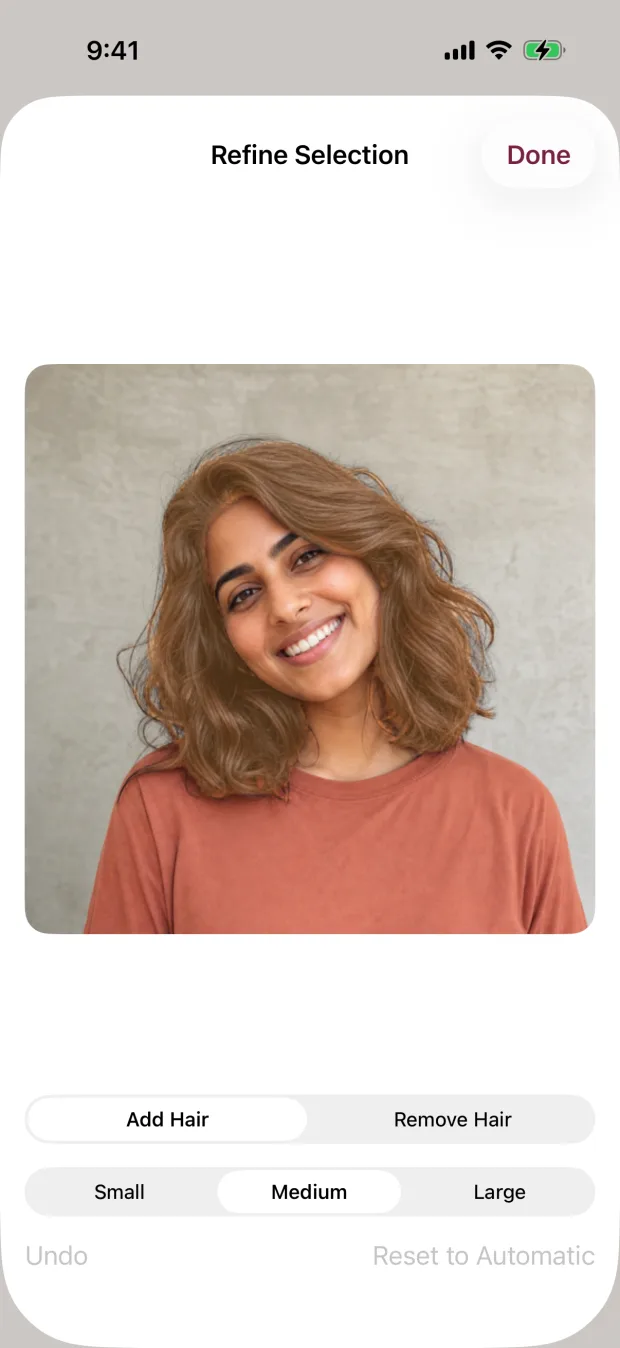
Open Refine Selection if some of your hair didn’t change color, or if the color crept onto your skin, clothes, or background. Add Hair brings in missed strands; Remove Hair protects what should stay untouched. Use the small brush around your hairline and the large one for broad sections.
Your brush strokes are kept separate from the automatic selection. Undo a single stroke, or tap Reset to Automatic to start over, so it’s safe to experiment.
Compare with your original
Tap Natural in the shade row to see your original photo, then tap your new shade again. Because the pose, crop, expression, and light never change, the only difference you’re judging is the color. Check that the new shade still shows your hair’s texture and shine. If it looks flat or too strong, lower the intensity or try a neighboring shade.
It’s worth looking at the edges you fixed, too. Zoom in and make sure the color hasn’t spread onto your face, neck, or clothes.
Save a copy, then decide in real life
When you find a preview you like, save it. The app writes a new image and never touches your original. The saved copy leaves out your location, original filename, camera serial, and other unrelated photo details.
Bring your favorite two or three previews to your colorist, or use them to decide which product instructions deserve a closer read. Your real result depends on your starting color, past color and treatments, the condition of your hair, lightening, products, and technique. A photo can’t settle those questions, but it can make the conversation a lot easier.
Keep the question small.
Ask “Do I like a warmer or cooler direction on me?” before “Can my hair reach this exact color?” The first is a visual choice. The second needs a colorist, or at least a strand test.
Private doesn’t mean everything is offline
The photo steps (choosing, finding your hair, color, corrections, comparing, and saving) stay on your device. Purchases and restores use Apple’s StoreKit and may need a connection. The app also uses RevenueCat for purchase reporting and limited onboarding analytics, which never include your photos, colors, or edits.
Your checklist
- Choose one clear, evenly lit photo
- Look over the automatic selection
- Try clearly different shades
- Adjust the intensity
- Brush in any tricky edges
- Tap Natural to compare
- Save a new copy for your colorist
Quick questions
Is a hair color try-on accurate?
It’s accurate as a picture of a color direction on your photo, and that’s its job. It can’t predict what dye will do on your hair, because that depends on your starting color, hair history, and technique.
Can I try hair color on my iPad?
Yes. The app works on iPhone and iPad with iOS or iPadOS 17 or later, and the bigger iPad screen is lovely for checking edges.
Can I try it before paying?
Yes. Setup lets you see a shade on your own photo before you choose weekly or lifetime access.